 Simple
ESP32 OTA updates: complete Arduino guide
Build ESP32 OTA updates over HTTPS with Arduino or PlatformIO. Install SimpleOTAClient, upload the correct application binary, and monitor a deployment.
Once an ESP32 is inside an enclosure, mounted on a wall, or installed at a customer site, updating it over USB stops being a reasonable release process. ESP32 OTA updates solve that problem by letting a device anywhere with internet access securely fetch an approved firmware build over HTTPS.
Unlike ArduinoOTA, which pushes a sketch from a computer on the same local
network, this guide uses an internet-based pull model. The ESP32 checks for an
approved release, downloads it directly from object storage, installs it in the
inactive OTA partition, and reports the result. It needs no public IP address or
open inbound port.
If same-LAN ArduinoOTA is no longer enough for the boards you have in the field, the comparison with managed fleet OTA is in ArduinoOTA vs managed ESP32 fleet OTA.
We will use the first-party SimpleOTAClient library and a free SimpleOTA project. The same sketch works whether you build with Arduino IDE or PlatformIO.
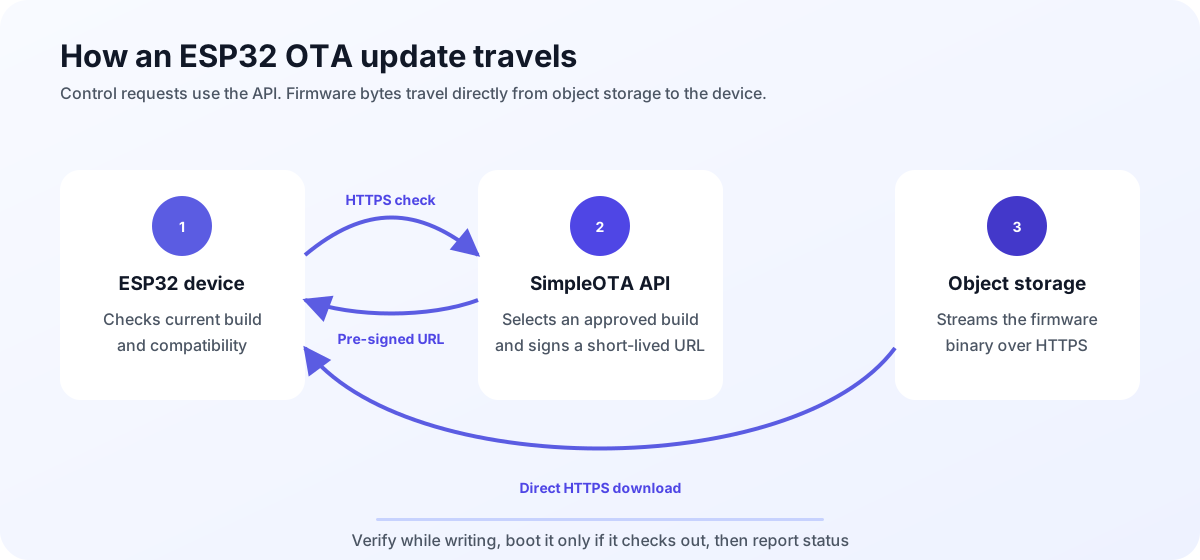 The API decides which build is eligible. The firmware binary then travels
directly from object storage to the ESP32.
The API decides which build is eligible. The firmware binary then travels
directly from object storage to the ESP32.
What you will build
You will flash one initial sketch over USB, deploy a second build over HTTPS, and verify its installation in the dashboard. Later builds follow the same OTA path without touching the USB cable.
Jump to: create a project · install the library · flash the initial sketch · build the binary · upload and deploy · troubleshooting
What you need
- An ESP32 board with Wi-Fi and an OTA-capable partition layout.
- Arduino IDE or PlatformIO with Arduino-ESP32 core 2.x or 3.x.
- A Wi-Fi network the board can join.
- A SimpleOTA account.
- About ten minutes for the first end-to-end test.
This tutorial uses Simple mode and one test device. Simple mode starts an immediate 100 percent deployment after each upload, which is convenient while learning. Use Advanced mode and a small canary percentage before updating a real fleet.
1. Create a project and token
Sign in to SimpleOTA, create a project, and choose Arduino as its default framework. A project keeps its devices, firmware, build numbers, and deployments isolated from every other project.
Open the project token section and create a token for this test. Keep the default Device (OTA polling) scope selected, copy the token when it is shown, and store it safely. SimpleOTA stores only a hash, so the raw value cannot be displayed again later.
We use a project token here because it can register the test device on its first check-in. For production hardware, provision a per-device token after registration. A project token has broader permissions than an individual device needs. The device-token guide covers the production pattern.
2. Install SimpleOTAClient
The API calls in this guide match SimpleOTAClient v0.4.0.
In Arduino IDE, open Sketch > Include Library > Manage Libraries, search for
SimpleOTAClient, and install it.
If Library Manager is unavailable, download a release zip from the SimpleOTAClient releases page, then use Sketch > Include Library > Add .ZIP Library.
For PlatformIO, add the library to the environment in platformio.ini:
[env:esp32dev]
platform = espressif32
board = esp32dev
framework = arduino
lib_deps = https://github.com/xanderwasserman/SimpleOTAClient-Arduino.git
monitor_speed = 115200
Keep the partition layout you already use if it has two application slots,
normally named ota_0 and ota_1. A single-app or “No OTA” partition layout
cannot perform an OTA update because there is no inactive slot in which to
write the new image. The new application binary must also fit in one OTA slot.
Espressif’s partition-table documentation
explains the available layouts and how to define a custom table.
3. Flash the initial sketch over USB
Replace the Wi-Fi details and token in this sketch, then flash it normally over USB:
#include <WiFi.h>
#include <SimpleOTAClient.h>

const char* WIFI_SSID = "your-wifi-name";
const char* WIFI_PASSWORD = "your-wifi-password";
const char* PROJECT_TOKEN = "soto_proj_xxxxxxxxxxxxxxxx";

#define FIRMWARE_VERSION "1.0.0"

SimpleOTAClient ota(
  PROJECT_TOKEN,
  SimpleOTAClient::CHIP_ESP32
);

static bool wifiUp() {
  return WiFi.status() == WL_CONNECTED;
}

void setup() {
  Serial.begin(115200);

  WiFi.mode(WIFI_STA);
  WiFi.begin(WIFI_SSID, WIFI_PASSWORD);
  Serial.println("Wi-Fi starting; OTA will wait for connectivity");

  ota.setVersionLabel(FIRMWARE_VERSION);

  // Check every 60 seconds for this tutorial. A production interval can be
  // much longer. Managed mode downloads, applies, and reboots automatically.
  ota.begin(60, nullptr, wifiUp);
}

void loop() {
  // Managed mode runs the OTA task in the background.
}
The sketch deliberately does not block while waiting for Wi-Fi before calling
begin(). The connectivity probe prevents network requests until Wi-Fi is up,
while begin() can initialize trial-install handling immediately on a future
OTA boot. SimpleOTAClient does not manage Wi-Fi or reconnection; production
firmware must own that logic.
Do not commit a real project token to a public repository. Keep local
credentials in an ignored secrets.h. Before shipping a fleet, replace the
project token with per-device credentials provisioned during manufacturing.
Choose the chip constant that matches your board. For Wi-Fi-capable boards the
available values are CHIP_ESP32, CHIP_ESP32S2, CHIP_ESP32S3,
CHIP_ESP32C3, and CHIP_ESP32C6. The library also defines CHIP_ESP32H2 for
applications that provide a suitable non-Wi-Fi IP transport.
Open the serial monitor after flashing. Once the board connects to Wi-Fi, the background task checks the SimpleOTA API over HTTPS. Because the constructor does not set a custom device ID, SimpleOTAClient uses the board’s Wi-Fi station MAC address. The project token lets the server register that ID on its first check, provided the account’s plan has device capacity. The API returns a normal “no update” response because you have not uploaded a release yet.
Refresh the project dashboard. The new device should appear with a recent
last_seen value.
4. Build the update binary
Change the version label so the updated firmware is easy to recognize:
#define FIRMWARE_VERSION "1.0.1"You can also make a visible behavior change, such as altering an LED blink rate or printing a new line at startup. That gives you an application-level signal that the new firmware is running.
In Arduino IDE, use Sketch > Export Compiled Binary. Select the application
image whose filename ends in .ino.bin.
| Build system | Upload this application image |
|---|---|
| Arduino IDE | <sketch-name>.ino.bin |
| PlatformIO | .pio/build/<environment>/firmware.bin |
Do not upload any of these files:
*.ino.merged.bin*.ino.bootloader.bin*.ino.partitions.bin*.elfor*.map
The merged image contains the bootloader, partition table, and application. It
is intended for a factory flash, not an OTA application slot. Uploading it is a
common cause of update_begin_failed because it is much larger than the inactive
application partition.
For the PlatformIO environment in this guide, the complete path is usually:
.pio/build/esp32dev/firmware.bin5. Upload and deploy
Open the project and select Upload firmware. In Simple mode:
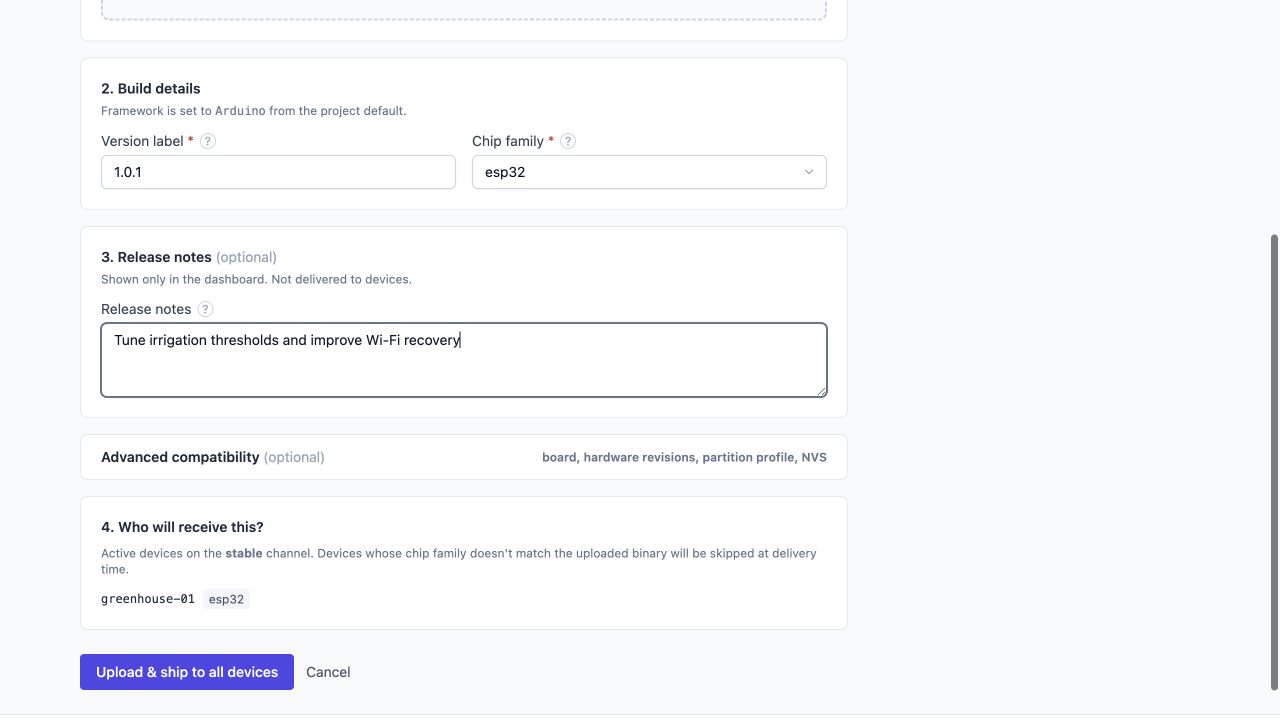 The upload screen previews the active devices on the target channel.
Compatibility is enforced when each device checks for an update.
The upload screen previews the active devices on the target channel.
Compatibility is enforced when each device checks for an update.
- Select the
.ino.binor PlatformIOfirmware.binapplication image. - Enter
1.0.1as the version label. - Choose the chip family matching the device, such as
esp32. - Add release notes if useful.
- Check the target-device preview.
- Select Upload & ship to stable. A new project ships Simple mode to its default channel, which is named stable.
SimpleOTA calculates the SHA-256 digest, stores the binary in object storage, allocates the next project build number, and creates an active deployment. Build numbers, not human-readable version labels, determine update ordering. They are monotonic within a project and are never reused.
The compatibility fields matter. A build for esp32s3 is not offered to a
device reporting esp32, even if the device belongs to the deployment’s target
group. Advanced mode can additionally constrain board ID and hardware revision.
6. Watch the OTA update
With the tutorial’s 60-second polling interval, the board normally checks again within a minute once it has network connectivity. If the deployment is active and the artifact is compatible, the API offers the newer build.
The API returns a short-lived firmware download URL, and the ESP32 downloads directly from that URL. During installation, SimpleOTAClient streams the image into the inactive OTA partition while calculating its SHA-256 digest.
When the download and verification succeed, the client commits the new
partition, persists the SimpleOTA build number in NVS, and restarts the ESP32.
It reports lifecycle events during the update. The terminal confirmed or
rolled_back event is persisted and retried until the server accepts it.
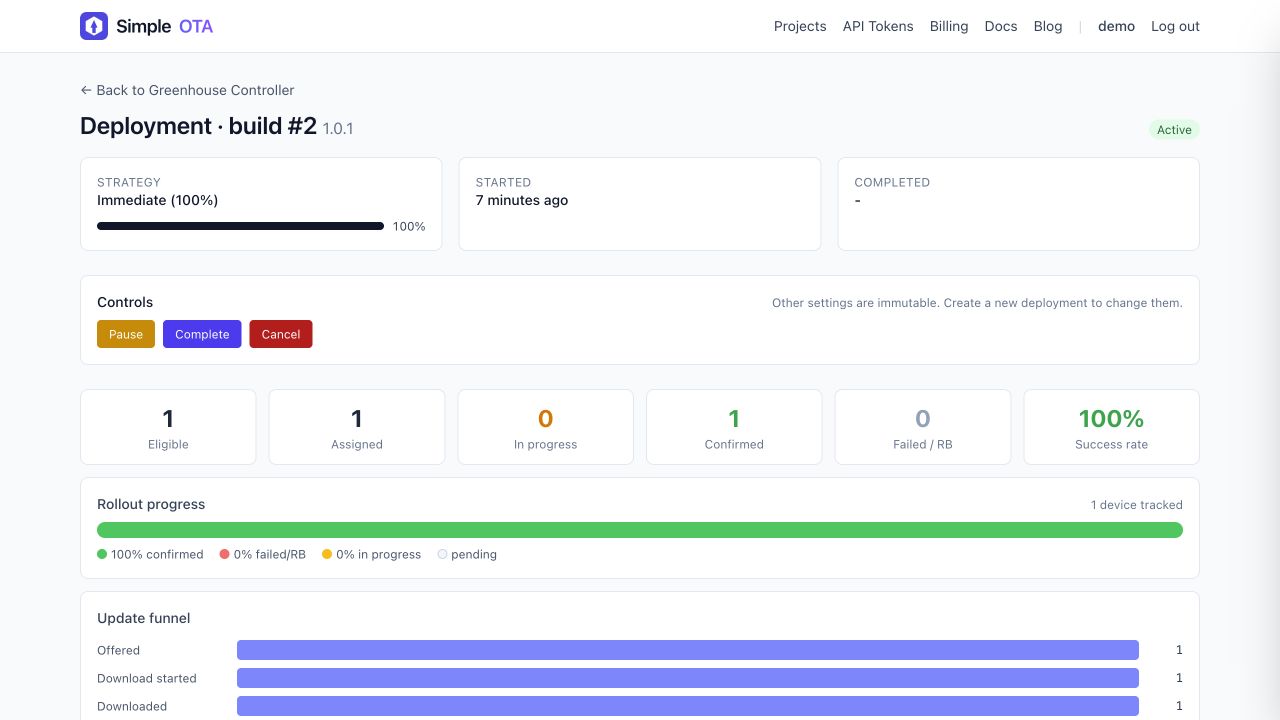 The rollout view separates eligible, assigned, in-progress, confirmed, and
failed devices and shows the update funnel for troubleshooting.
The rollout view separates eligible, assigned, in-progress, confirmed, and
failed devices and shows the update funnel for troubleshooting.
After reboot, confirm your visible 1.0.1 behavior and check that the dashboard
shows the new build on the device.
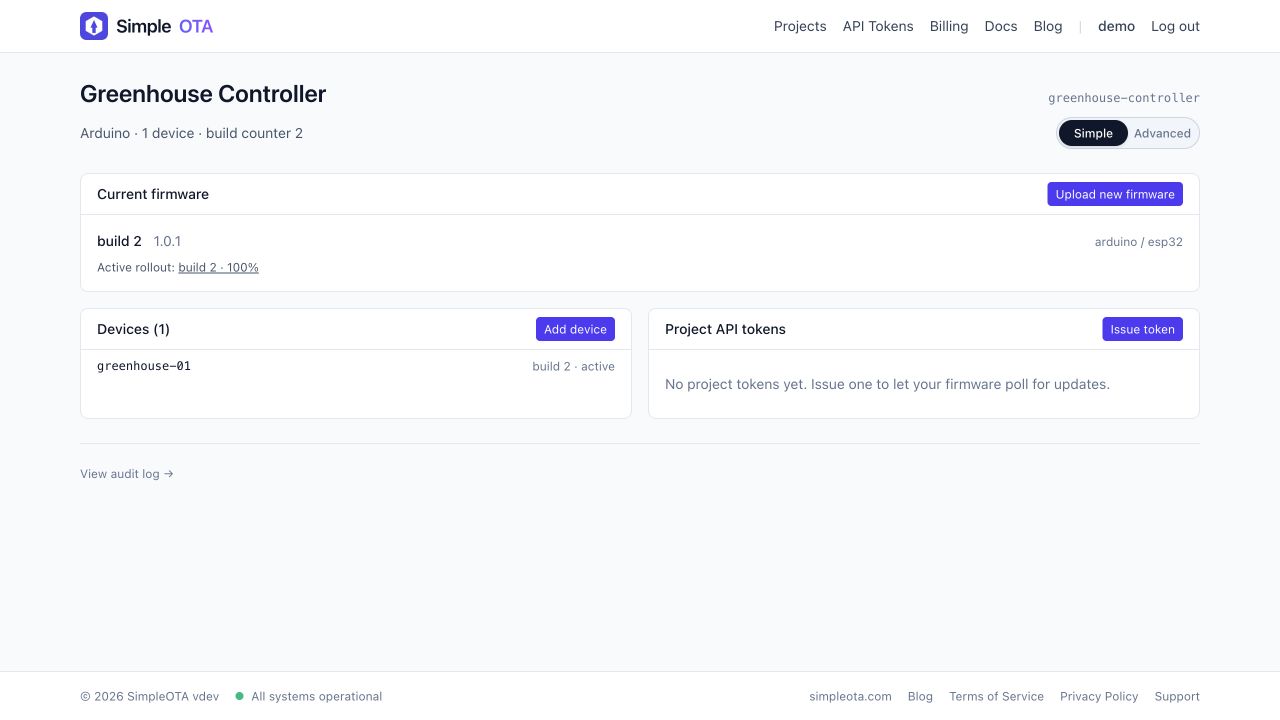 The project view now shows the deployed build as current and the device as
confirmed. This screenshot uses sanitized demonstration data.
The project view now shows the deployed build as current and the device as
confirmed. This screenshot uses sanitized demonstration data.
What HTTPS protects
There are two HTTPS connections in this flow:
- The device checks the SimpleOTA API, authenticates, and receives the update decision.
- The device downloads from a short-lived HTTPS object-storage URL.
HTTPS protects both connections in transit. The pre-signed download URL expires, so there is no permanent public firmware address to discover or reuse.
Basic-mode artifacts are also checked against the expected SHA-256 digest. That detects corruption, but a checksum alone is not proof that you authorized a build. For that guarantee, use signed mode. SimpleOTAClient can verify an Ed25519 signature over the exact firmware bytes on the ESP32 before the image is made bootable. See Signed firmware, verified on the device for the threat model and migration path.
Automatic rollback
Rollback is not part of the successful update path and you should not trigger it
during this tutorial. A successful managed update reboots into the new image,
reaches SimpleOTA again, and ends in confirmed.
An OTA-capable ESP32 keeps the previous application in the other OTA slot while the new image starts. By default, SimpleOTAClient treats the new image as a trial so it has a recovery path if that confirmation never happens.
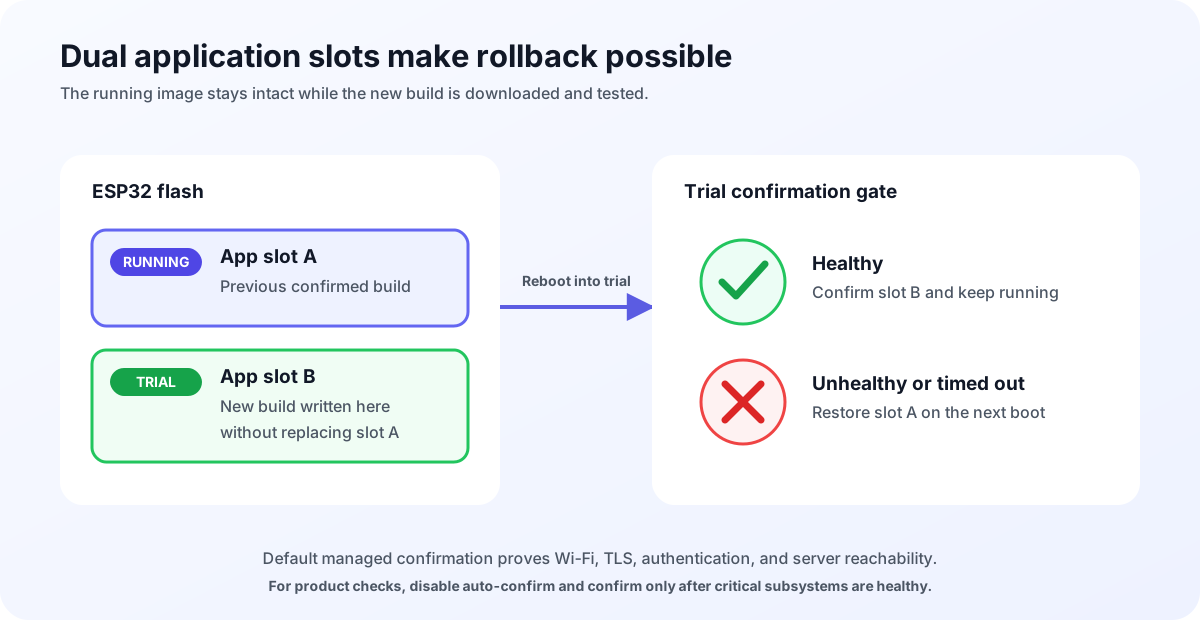 The previous image remains available until the trial build is confirmed or the
confirmation timeout causes a rollback.
The previous image remains available until the trial build is confirmed or the
confirmation timeout causes a rollback.
In managed mode, the default behavior is to confirm the trial after the client successfully reaches the check endpoint again. That proves the new image booted, joined Wi-Fi, completed TLS, and authenticated with the API.
For many prototypes, that is a useful health gate. A product may require its
sensors, storage, or backend connection to work before confirming a build. In
that case, disable automatic confirmation and call confirmRunning() only
after the application becomes healthy. The
rollback guide covers the code,
timeout selection, and application-level limitations.
If the trial is not confirmed in time, the client restores the previous partition and reports the rollback. The deployment can then pause automatically so the same build is not offered to the rest of the fleet.
Troubleshooting
The device never appears
- Confirm Wi-Fi is connected.
- Check that the project token was copied correctly.
- Confirm the board can reach
https://simpleota.com. - Check that the account’s plan has capacity for another active device.
- Inspect the serial output for authentication or TLS failures.
The device appears but no update is offered
- Confirm the deployment is active.
- Confirm the artifact build number is newer than the device’s current build.
- Check that framework and chip family match.
- Wait for the configured polling interval or restart the test board.
- In Advanced mode, check board ID, hardware revision, group, channel, and rollout percentage.
Installation fails with update_begin_failed
The usual causes are an incorrect merged/factory image or a binary larger than
the inactive OTA partition. Upload only the application .bin, verify the
board’s partition layout contains two OTA slots, and compare the compiled
binary size with the size of one slot.
The new firmware keeps rolling back
If you use polling mode or disabled managed auto-confirm, call
confirmRunning() after the application becomes healthy. Also confirm that the
timeout is long enough for the board’s normal startup process.
The device downloads the same release repeatedly
SimpleOTAClient stores the installed server build number in the
simpleota/sota_build NVS key. If that namespace is erased or overwritten, the
device reports build 0 and can be offered the same deployment again. Do not
write to the library’s NVS namespace from application code.
Where to go next
You now have an ESP32 that can receive Arduino firmware over HTTPS without hosting an OTA server or touching the USB cable for every release.
Before using the same workflow for a fleet:
- Replace the project token with per-device credentials.
- Increase the polling interval to suit the product and power budget.
- Define an application-specific trial health check.
- Enable signed firmware for authorization at the device.
- Use a staged rollout instead of immediately targeting every device.
- Automate the build and upload from PlatformIO and CI.
The complete configuration and API reference live in the Arduino integration guide.
Create a free SimpleOTA project and use this guide to ship the first HTTPS update to a test board.