 Simple
ESP32 OTA updates with ESP-IDF: a first-party component
Add managed OTA to an ESP-IDF project with one command. Streaming SHA-256 and Ed25519 verification, bootloader-supervised rollback, and the same wire protocol as the Arduino client.
Until now, using SimpleOTA from ESP-IDF meant calling the API yourself. The protocol is documented and stable, so it was always possible, but you had to write your own HTTP client, your own partition handling, and your own trial-boot logic before you could ship a single update.
That work is done. SimpleOTA now has a first-party ESP-IDF component on the Espressif Component Registry, and adopting it is one command.
idf.py add-dependency "xanderwasserman/simpleota^0.1.0"The component checks for updates on an interval, downloads them, verifies them as they stream to flash, installs them into the inactive OTA slot, and reports every step back to your project. On ESP-IDF it also does something the Arduino client cannot: it hands the recovery decision to the bootloader.
What you will build
You will add the component to an ESP-IDF project, flash it once over USB, then deploy a second build over HTTPS and watch it confirm in the dashboard.
Jump to: add the component · partitions and rollback · initialize the client · first flash · upload and deploy · rollback · signed firmware · troubleshooting
What you need
- ESP-IDF v5.1 or newer, with the toolchain installed and
idf.pyon your path. - An ESP32-family board with at least 4 MB of flash.
- A Wi-Fi network the board can join.
- A SimpleOTA account and a project token.
- About fifteen minutes for the first end-to-end test.
If you are new to ESP-IDF, start from the packaged example rather than an empty project. It ships with a working partition layout, Wi-Fi bring-up, and the OTA configuration already set:
idf.py create-project-from-example "xanderwasserman/simpleota^0.1.0:basic"1. Add the component
For an existing project, run add-dependency from the project root. The
component manager writes the dependency into main/idf_component.yml and fetches
it on the next build.
idf.py add-dependency "xanderwasserman/simpleota^0.1.0"There is nothing else to install. The component pulls in only what ships with
ESP-IDF itself, plus a vendored copy of Monocypher for
Ed25519. It deliberately avoids cJSON, because the bundled json component was
removed from the IDF core in 6.0, so responses are parsed with a small scanner
instead. One manifest therefore works from v5.1 through 6.x with no
version-conditional rules.
2. Set up partitions and rollback
This is the step you cannot fix later, so it is worth getting right before the first flash.
OTA needs two application slots, and supervised rollback needs a bootloader that was built with rollback support. The bootloader itself cannot be updated over OTA. If you flash a board without these options and change your mind later, you need physical access and a USB cable again.
Put these in your project’s sdkconfig.defaults before the first serial flash:
# Two OTA app slots (no factory partition; first boot runs from ota_0).
CONFIG_PARTITION_TABLE_TWO_OTA=y
# A new image gets exactly one attempt until it is confirmed.
CONFIG_BOOTLOADER_APP_ROLLBACK_ENABLE=y
# The two-OTA layout needs 4MB flash; the 2MB default cannot fit two app slots.
CONFIG_ESPTOOLPY_FLASHSIZE_4MB=y
# Size-optimized builds leave OTA headroom in the 1MB app slots.
CONFIG_COMPILER_OPTIMIZATION_SIZE=y
One more setting will save you an evening of confused debugging:
CONFIG_ESP_TASK_WDT_TIMEOUT_S=30A TLS handshake is synchronous and CPU-bound inside mbedTLS. The OTA task cannot
yield while the certificate chain is verified, so the priority-0 idle task can be
starved for longer than the default five-second watchdog window. It is worst on
the classic ESP32 at 160 MHz, where the first handshake after boot is the
slowest, and it surfaces as an alarming but harmless task_wdt: ... IDLE
warning. Widening the window keeps the watchdog able to catch real hangs, which
disabling it would not.
3. Initialize the client
The configuration is a struct in the style of esp_http_client_config_t. Exactly
one field is required: your token. Everything else has a working default.
#include "nvs_flash.h"
#include "simpleota.h"

static bool is_connected(void *ctx) {
    return wifi_is_connected();  /* your own connectivity check */
}

static void on_ota_event(const simpleota_event_t *evt, void *ctx) {
    switch (evt->id) {
    case SIMPLEOTA_EVENT_UPDATE_AVAILABLE:
        ESP_LOGI(TAG, "update available: build %" PRIu32, evt->build_number);
        break;
    case SIMPLEOTA_EVENT_UPDATE_FAILED:
        ESP_LOGW(TAG, "update failed: %s", evt->reason ? evt->reason : "?");
        break;
    case SIMPLEOTA_EVENT_CONFIRMED:
        ESP_LOGI(TAG, "build %" PRIu32 " confirmed", evt->build_number);
        break;
    default:
        break;
    }
}

void app_main(void) {
    ESP_ERROR_CHECK(nvs_flash_init());   /* required: OTA state lives in NVS */
    ESP_ERROR_CHECK(wifi_connect());     /* your own Wi-Fi bring-up */

    simpleota_config_t cfg = {
        .token = CONFIG_EXAMPLE_SIMPLEOTA_TOKEN,
        .board_id = "esp32-devkitc",
        .check_interval_s = 300,         /* default is 3600 */
        .event_cb = on_ota_event,
        .is_connected = is_connected,
    };
    ESP_ERROR_CHECK(simpleota_init(&cfg));
    ESP_ERROR_CHECK(simpleota_start());
}
Two defaults are worth knowing. The device ID defaults to the Wi-Fi station MAC
formatted as aa:bb:cc:dd:ee:ff, exactly as the Arduino client formats it, so a
board keeps its identity if you move it between frameworks. The chip family
defaults to CONFIG_IDF_TARGET, so a build for an ESP32-C3 reports esp32c3
without you configuring anything.
The component does not manage Wi-Fi. The is_connected callback lets it postpone
network activity rather than failing check-ins while the radio is down, but
reconnection stays your application’s job.
TLS uses the ESP-IDF certificate bundle by default, so there is no CA certificate
to paste into your source and no expiry to remember. If you terminate TLS
somewhere that needs a specific root, set cert_pem instead.
Do not commit a real project token. Keep it in menuconfig or an ignored header,
and provision per-device tokens before you ship a fleet.
4. Flash the first build over USB
Build and flash normally. This first image is the one that establishes the partition layout and the rollback-capable bootloader, which is why it has to arrive over the cable:
idf.py build flash monitorOnce the board joins Wi-Fi, the component checks in. Because the config does not set a device ID, it registers itself under its Wi-Fi MAC, and the project token lets the server accept that registration on first contact. The API answers that no update is available, which is correct: you have not uploaded one yet.
Refresh the project in the dashboard and you should see the device appear with a
recent last_seen and a framework of esp_idf. If it does not, jump to
troubleshooting before going further, because everything
below assumes the device is checking in.
5. Upload and deploy
Make a visible change and bump the version label so the new build is easy to
recognize, then build again and upload build/<your-project>.bin in the
dashboard. Set the framework to ESP-IDF and the chip family to match your
target.
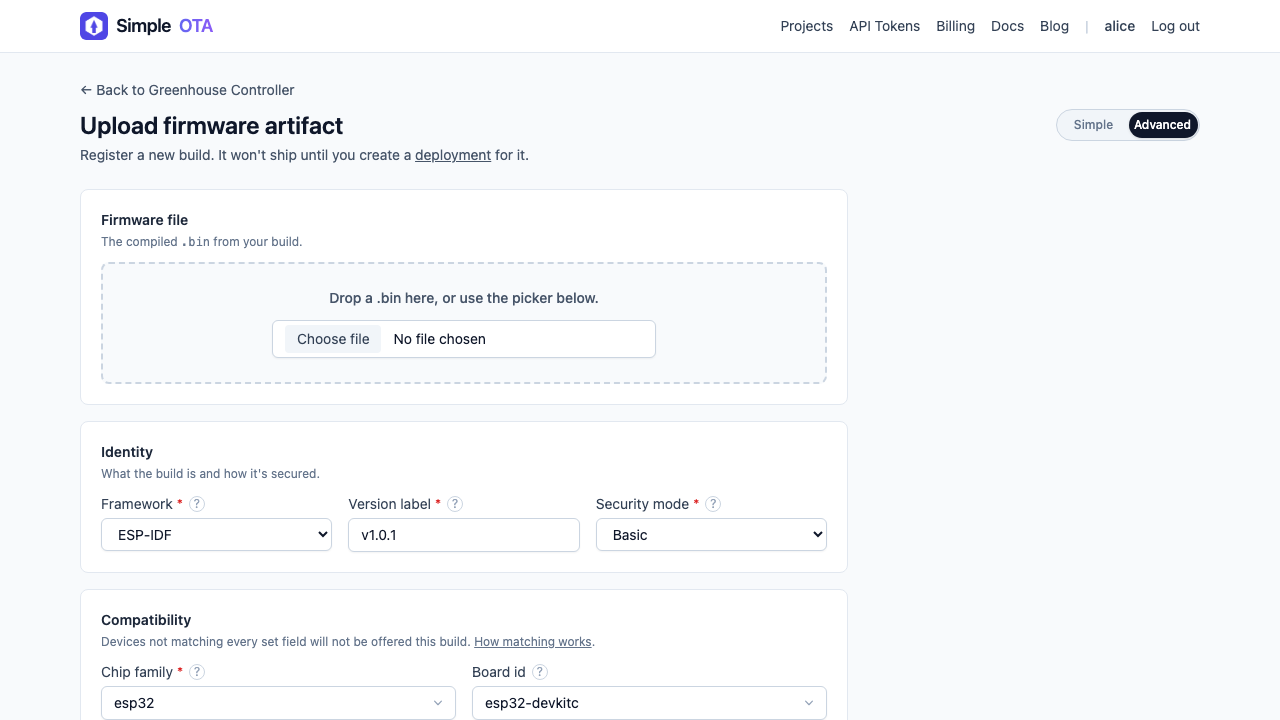 Upload the application binary from
 build/, not a merged factory image.
Upload only the application image. ESP-IDF also produces bootloader.bin and
partition-table.bin, and those belong to a factory flash, not an OTA slot.
Uploading a merged image is the most common cause of update_begin_failed,
because it is far larger than a single application partition.
SimpleOTA hashes the binary, stores it, allocates the next build number, and creates a deployment. Ordering comes from build numbers, not from the human-readable version label.
6. Watch the update
At the 300-second interval above, the board checks in, is offered build 2, and installs it:
I (11842) example: update available: build 2
I (12984) example: downloading: 262144/902144 bytes
I (18761) example: downloading: 902144/902144 bytes

  *** device reboots into the new image ***

I (3612) example: trial boot of build 2 (unconfirmed)
I (9188) example: build 2 confirmed
The API hands back a short-lived, pre-signed download URL, and the firmware travels straight from object storage to the device. There is no permanent public address for your binaries to be found at later.
As the bytes arrive, the component streams them into the inactive slot and verifies them on the way past. The SHA-256 digest and, in signed mode, the Ed25519 signature are computed incrementally as each chunk is written, and the partition is only made bootable once both pass.
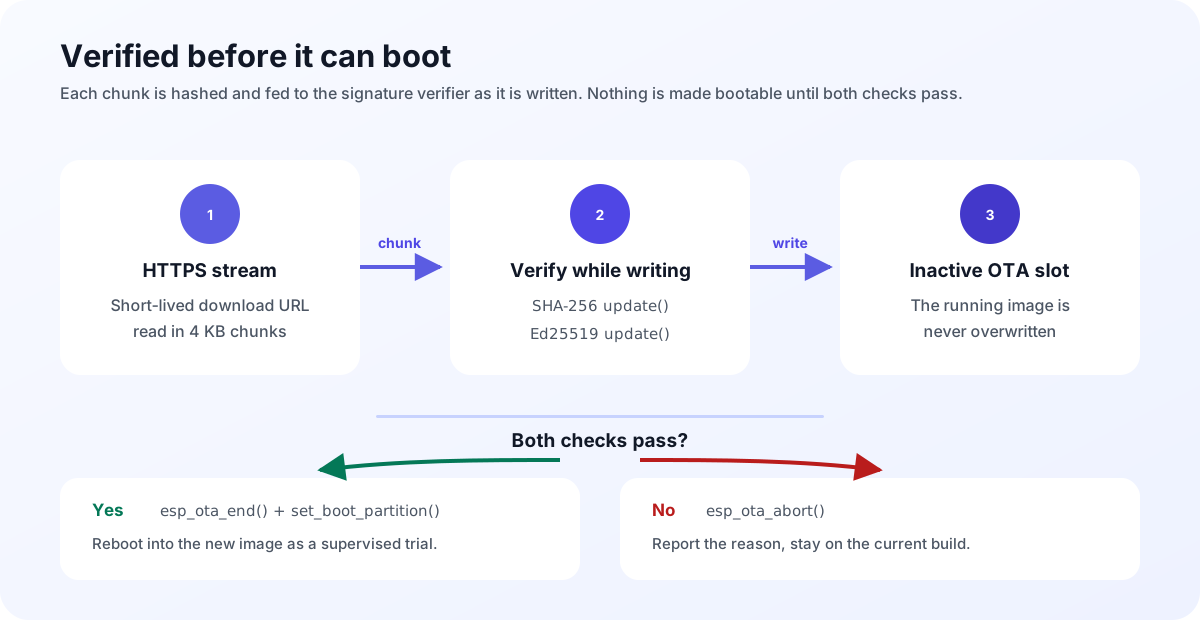 Every failure path calls
 esp_ota_abort(). A rejected image never becomes
bootable, and the running firmware is untouched.
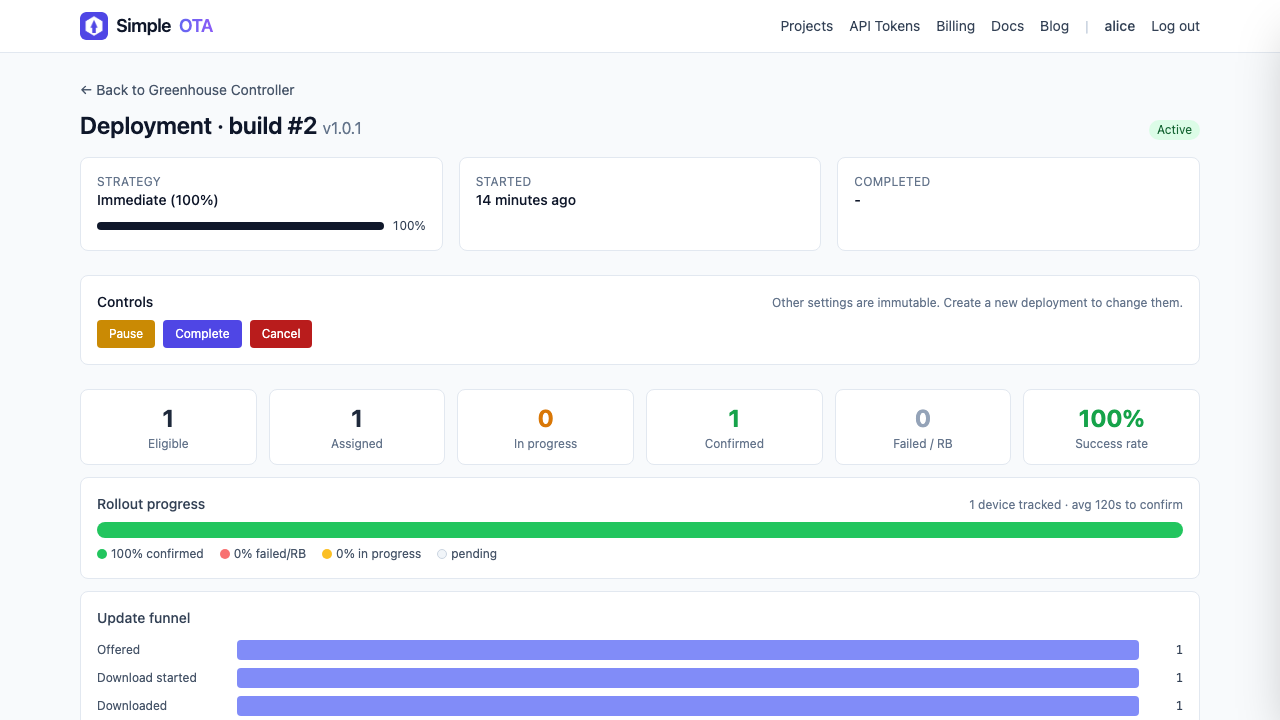 The rollout view separates eligible, assigned, in-progress, confirmed, and
failed devices.
The rollout view separates eligible, assigned, in-progress, confirmed, and
failed devices.
Automatic rollback on ESP-IDF
This is where ESP-IDF is genuinely better than the Arduino core, and it is the best reason to prefer it for a product.
With CONFIG_BOOTLOADER_APP_ROLLBACK_ENABLE, a freshly installed image reboots
in the PENDING_VERIFY state, and the bootloader gives it exactly one attempt.
If the application does not mark itself valid before the next reset, the
bootloader marks the image aborted and boots the previous slot on its own.
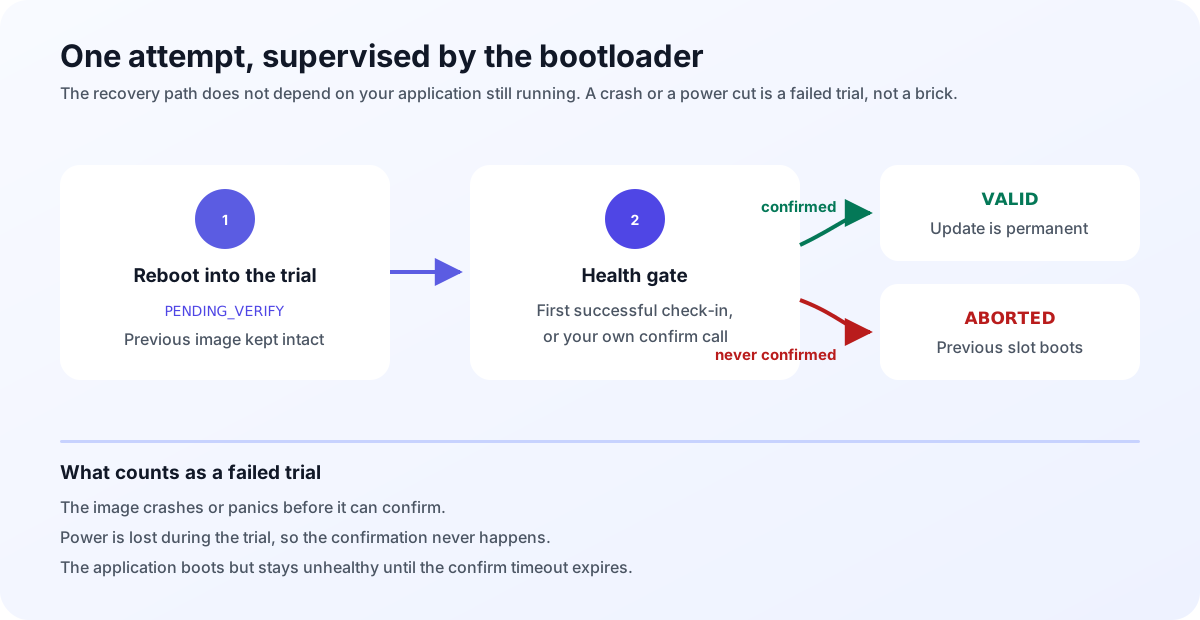 The previous image stays in its slot until the trial is resolved either way.
What matters is who is responsible for recovery. It is not your firmware. An
image that panics in app_main, or a board that loses power thirty seconds into
its trial, still comes back on the previous build. A timer in the application
cannot promise that, because the application is the thing that failed.
By default the component confirms a trial after the first successful check-in. That proves the new image booted, joined Wi-Fi, completed a TLS handshake, and authenticated against the API. For a prototype, that is a reasonable health gate.
For a product it usually is not enough. If your firmware needs its sensors, storage, or backend session working before you would call a build good, make the decision yourself:
simpleota_config_t cfg = {
    .token = PROJECT_TOKEN,
    .manual_confirm = true,
    .confirm_timeout_s = 600,   /* default 300, clamped to [10, 86400] */
    /* ... */
};

/* Later, once the application is genuinely healthy: */
simpleota_confirm();
If simpleota_confirm() is never called before the timeout expires, the
component rolls back and reports confirm_timeout, and the deployment can pause
itself so the same build is not pushed to the rest of the fleet.
If you also need to control the moment of restart, set disable_auto_reboot and
call simpleota_reboot_for_update() when your application reaches a safe point.
Signed firmware
Signed mode works the same way it does on Arduino. Pin the public key from your project’s signing keys page, and the device verifies an Ed25519 signature over the exact firmware bytes before the image is allowed to boot.
static const simpleota_signing_key_t keys[] = {
    { .key_id = "prod-2026", .pem =
        "-----BEGIN PUBLIC KEY-----\n"
        "MCowBQYDK2VwAyEA...\n"
        "-----END PUBLIC KEY-----\n" },
};

simpleota_config_t cfg = {
    .token = PROJECT_TOKEN,
    .security_mode = SIMPLEOTA_SECURITY_SIGNED,
    .signing_keys = keys,
    .num_signing_keys = 1,
    /* ... */
};
The gate fails closed. Once a device is configured for signed mode with at least
one pinned key, an offer without a usable signature is rejected and reported as
signature_invalid instead of being quietly installed. An unparseable PEM fails
at simpleota_init() rather than leaving the device running unverified, so a
typo in your key stops the board at startup instead of three deployments later.
You can pin two keys at once, which is what makes rotation survivable: ship a build that trusts both the old and the new key, wait for the fleet to take it, then drop the old one.
One warning about the wider ecosystem. mbedTLS has no EdDSA support on any
ESP-IDF version, so any guide suggesting mbedtls_pk_verify_ext with an Ed25519
key is wrong and will not work. That is why the component vendors Monocypher. The
threat model and the migration path from unsigned firmware are covered in
Signed firmware, verified on the device.
Supported versions and targets
The manifest requires ESP-IDF v5.1 or newer. CI builds the examples on the version floor and on the current release, across three chips:
| Target | Built in CI |
|---|---|
esp32 |
v5.1.4 (basic and signed), v5.3.2 (basic) |
esp32s3 |
latest (basic) |
esp32c3 |
latest (basic and signed) |
esp32s2, esp32c6, esp32h2 |
Declared as supported, not in the CI matrix |
That last row is a deliberate admission rather than an oversight. Those targets use the same code paths and should work, but they are not built on every commit, so treat them as supported and unverified, and open an issue if you hit something.
Arduino parity
A mixed fleet behaves uniformly. The signing gate was ported one to one and is tested against the same vectors as the Arduino client.
| Arduino | ESP-IDF | |
|---|---|---|
| Wire protocol and status lifecycle | Same | Same |
| Ed25519 signed firmware | Yes | Yes |
| Default device ID | Wi-Fi STA MAC | Wi-Fi STA MAC |
| Rollback supervision | Application timer | Bootloader |
| Recovery after a crash loop | Not guaranteed | Guaranteed |
| TLS roots | CA pasted into the sketch | Certificate bundle |
Troubleshooting
The build cannot find simpleota.h
Check that add-dependency wrote to the manifest of the component that includes
it, normally main/idf_component.yml, then run idf.py reconfigure. If you have
been switching between a local checkout and the registry version, delete
managed_components/ and dependencies.lock and build again.
The device never appears in the dashboard
Confirm Wi-Fi is up, that the token was copied whole, and that the board can
reach https://simpleota.com. Check the plan has capacity for another active
device. The serial log names the failure: a token problem and a TLS problem look
nothing alike.
task_wdt: ... IDLE warnings during the first check
Expected on a slow first TLS handshake. Set CONFIG_ESP_TASK_WDT_TIMEOUT_S=30 as
described above rather than disabling the watchdog.
Installation fails with update_begin_failed
Either the wrong binary was uploaded or it does not fit. Upload
build/<project>.bin, never a merged image, and compare its size against a
single application slot in your partition table.
The device never leaves the trial state
Either the check-in after reboot is not succeeding, or you set manual_confirm
and never call simpleota_confirm(). Watch the serial log across the reboot: the
component logs a trial boot on startup and a confirmation when the gate passes.
The device downloads the same build repeatedly
The installed build number lives in the simpleota NVS namespace. If that
namespace is erased, the device reports build 0 and can be offered the same
deployment again. Do not write to it from application code.
Where to go next
You now have a board that takes firmware over HTTPS, verifies it before trusting it, and recovers on its own when a build turns out to be bad.
Before pointing this at a fleet:
- Replace the project token with per-device credentials.
- Raise the check interval to suit your power budget.
- Define a real health check and switch to
manual_confirm. - Turn on signed firmware.
- Roll out to a small percentage before everyone.
The full configuration reference is in the ESP-IDF integration guide, and the source is on GitHub.
This is v0.1.0. There is one client instance per application, and no esp_event
integration yet. Both are on the list. If you put it on hardware and something
behaves oddly, open an issue with the serial log.
Create a free SimpleOTA project and ship your first ESP-IDF update over HTTPS.